Here you can download the object_reference_cameras.zip add-on file (requires Blender 2.8 or later)
Before using this tutorial, you should install Reference Cameras add-on in your Blender (Here is a description how to do it).
Note: in 2021 Marcelo Marques (mmmrqs) created new version of this add-on, extended by multiple additional functions. It is available from this GitHub repository.
In the description below I am using the original (simpler) version. This add-on groups utilities for managing cameras that I use for “fitting” my models into reference photos. (You can use a high-resolution photo as a precise reference, just like the scale drawing. See Part 1 and Part 2 of the tutorial that I wrote on this subject).
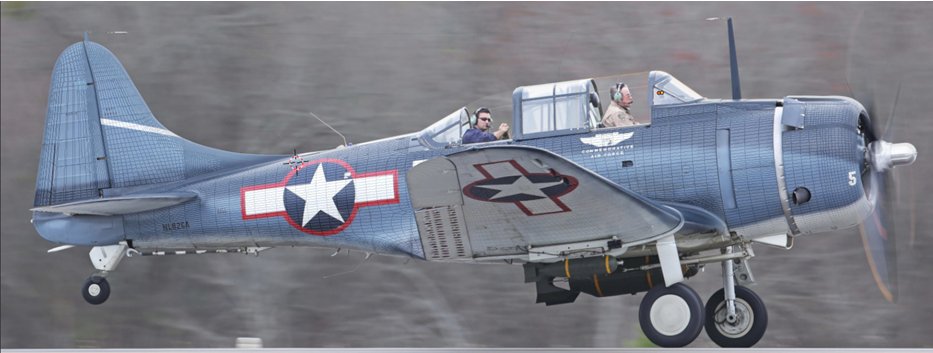
Fig. 1. and Fig. 2 show an example of such a model fitted into reference photo:
|
| Fig. 1 Douglas SBD 3D model, fitted into a reference photo |
|
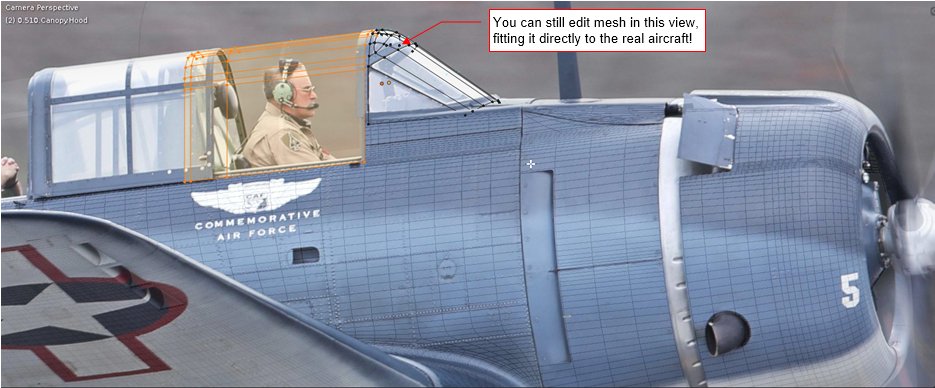
| Fig. 2 Details of the model and its reference photo |
The model in Fig. 1 and Fig. 2 is displayed in a perspective projection from a camera. In the text below I refer to such a camera as “reference camera”. Just as in the case of the scale plans, where you use at least three different views, you can define multiple reference cameras that contain aircraft photos taken from different directions.
Each reference camera:
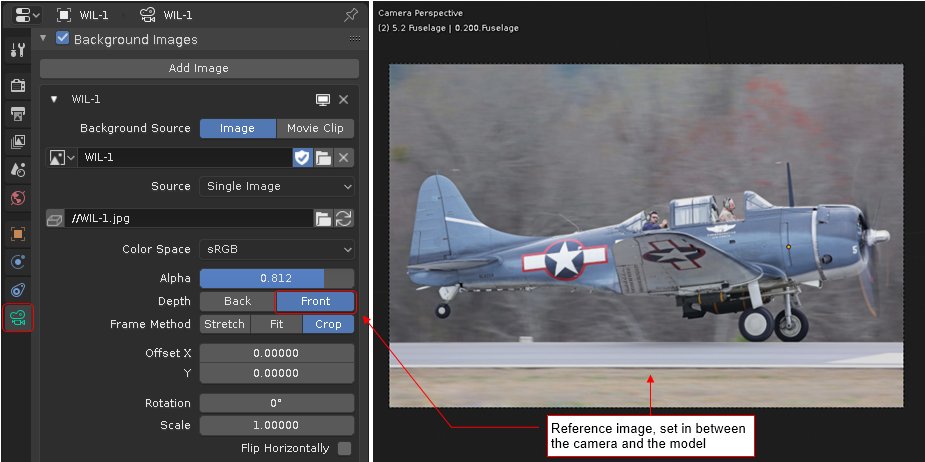
displays a reference photo as its Background Image (as in Fig.3);
is directed toward an auxiliary target object (this is implemented by a Track To constraint, as in Fig. 4)
|
| Fig. 3 Reference camera background image |
|
|
| Fig. 4 Auxiliary camera target object |
Such an auxiliary object gives you an intuitive control over the camera direction. (Each movement of the target object causes corresponding rotation of the assigned camera)
This add-on is named Reference Cameras. After installation, you will find it in the Object category. To use it in Blender, you have to activate it in the Preferences window (Fig. 5):

|
| Fig. 5. Activation of the Reference Cameras add-on. |
When activated, this plugin creates additional Cameras tab to the 3D View side panel (the panel, which visibility you can toggle typing the [N] key):
|
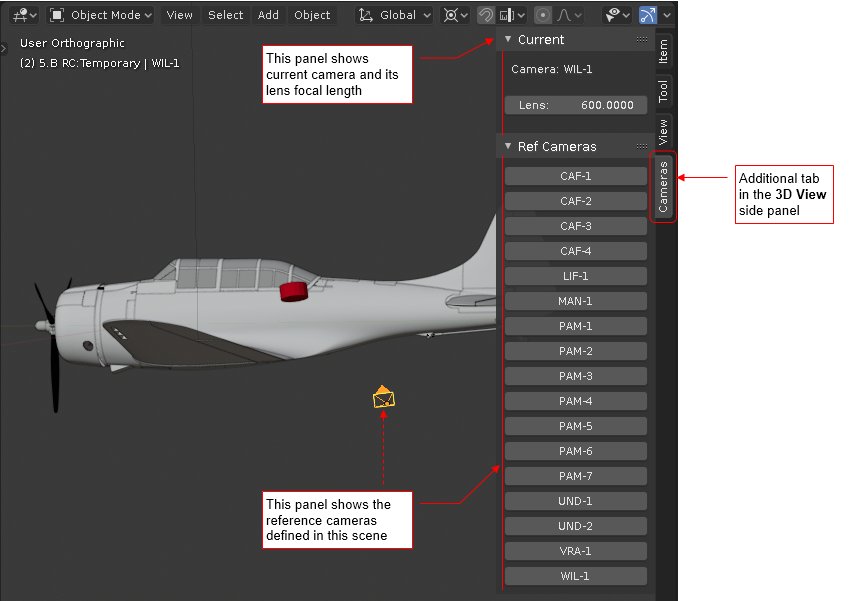
| Fig. 6. Contents of the Cameras tab |
Manual switching between reference cameras is cumbersome. You have to select the camera object, set it as the active camera, then adjust the reference image aspect ratio in the Output tab. I needed a utility for single-click switching between the reference cameras. (It has to be as easy as switching between the orthogonal views). Thus, in the Cameras tab you can find the Ref Cameras panel. Each button in this panel represents a reference camera defined in your scene.
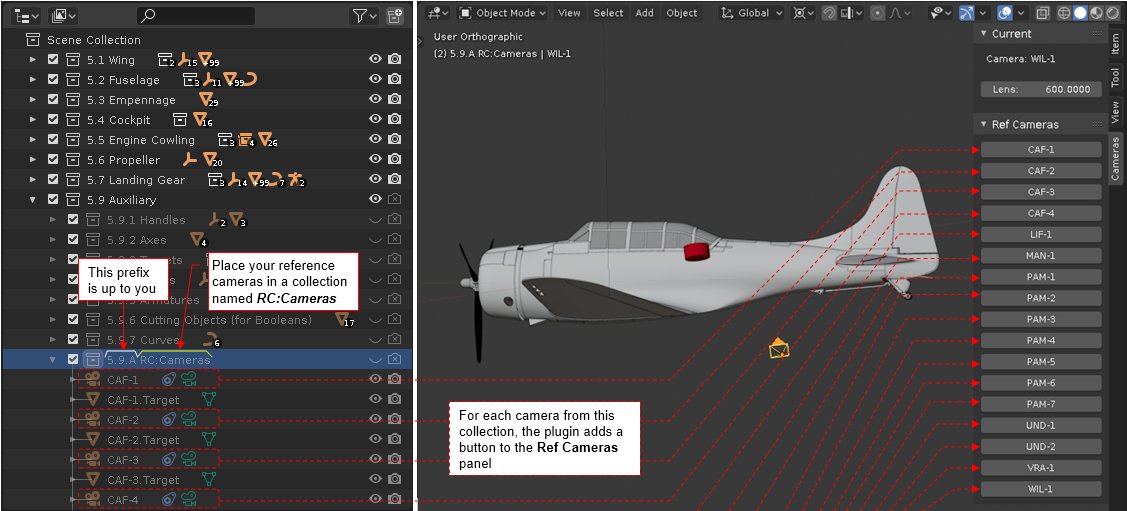
The content of this panel is automatically generated from a collection which name ends with “RC:Cameras” text:
|
| Fig. 7. Automatic generation of the Ref Cameras buttons |
All what you have to do is to place all your reference cameras in such a collection. Its prefix is still up to you. As you can see in the figure above, I also placed there the camera targets – just to have everything “in one place”. Once activated, Reference Cameras add-on monitors structure of the current scene. When it finds the first collection which name ends with “RC:Cameras”, it searches its contents for the reference cameras (i.e. cameras with Background Images and active Track To constraints). For each such a camera it adds a button in the Ref Cameras panel. (Labeled with the camera object name).
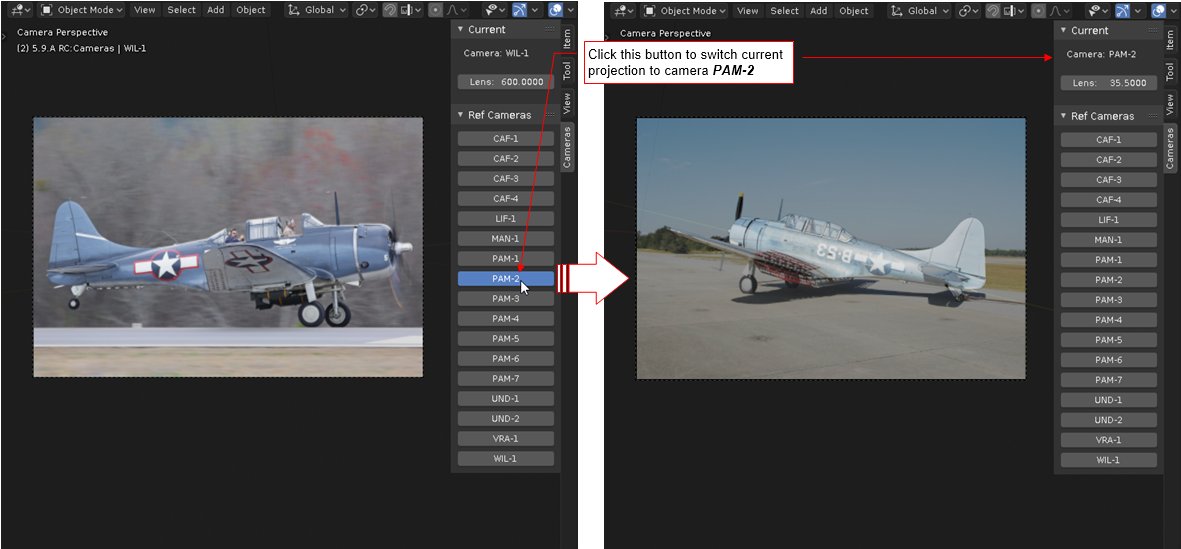
When you click such a button, it switches the projection in the active 3D View to the corresponding reference camera:
|
| Fig. 8. Switching 3D View projection to another reference camera |
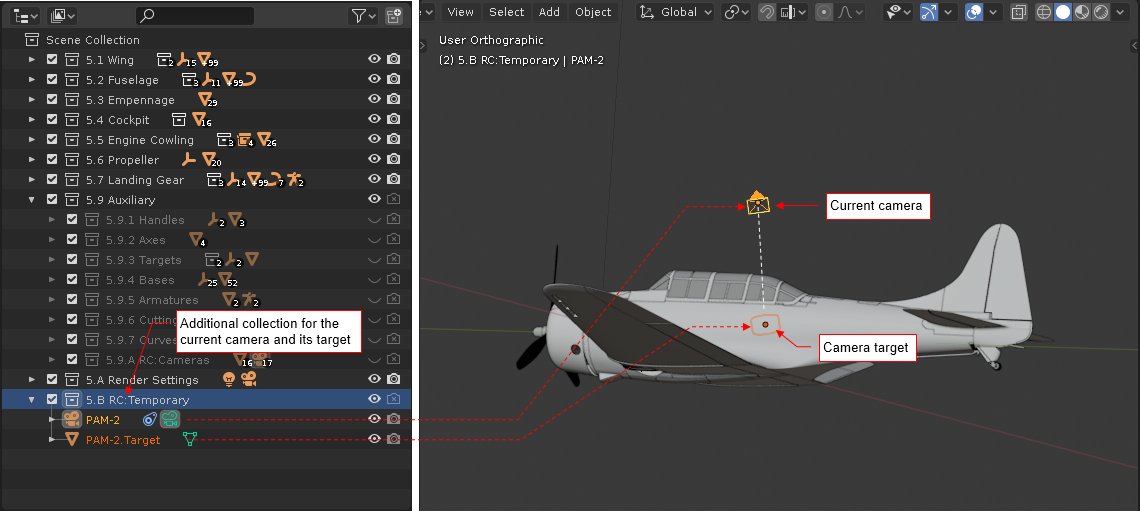
After you click this button, the add-on also places additional links to the current camera and its target in a collection named RC:Temporary:
|
| Fig. 9. “Working” collection: RC:Temporary |
Most probably you will keep collection *RC:Cameras as invisible (to avoid clutter in the scene – you do not need to see all camera targets simultaneously). That’s why this plugin “exposes” links to the current camera and its target in a separate, visible collection. In this way you can easily adjust this projection, when needed.
Reference Cameras will create RC:Temporary collection, if it does not exist in your scene. Once it is created, you can move it into any place in your scene hierarchy. Like in the case of the *RC:Cameras, you can also add a prefix to this name.
Note: collection RC:Temporary must be visible. Otherwise the Ref Cameras buttons will not work
Note: the active camera and its target are simultaneously in two collections: *RC:Cameras (this is their permanent location), which is usually hidden, and *RC:Temporary, which must be visible. Content of the *RC:Temporary is cleared every time you click a button from the Ref Cameras panel.
For the modern photos created as *.jpg files, you can read their camera focal length from the image metadata and then set this value to your reference camera in Blender. Then you can focus on determining the remaining six unknowns (the Xc, Yc, Zc of the camera location, and its direction, determined by the Xt, Yt, Zt coordinates of the target object). However, for the older photos the focal length is the seventh unknown. In the picture below you can see a case when I did what I could to set up the camera and target position, matching the aircraft contour. However, there were still differences in the wing “trapeze” shape and in the direction of the propeller blade (the one which is pointing toward the camera):

|
| Fig. 10. An example of a perspective projection, which camera requires different focal lens |
These are symptoms of a wrong camera lens length.
When you try to alter this parameter without the Reference Cameras plugin, you will observe significant changes in the model relative size:
|
| Fig. 11. Side effect of altering the camera lens focal length in the standard Blender: a serious change of the relative model size |
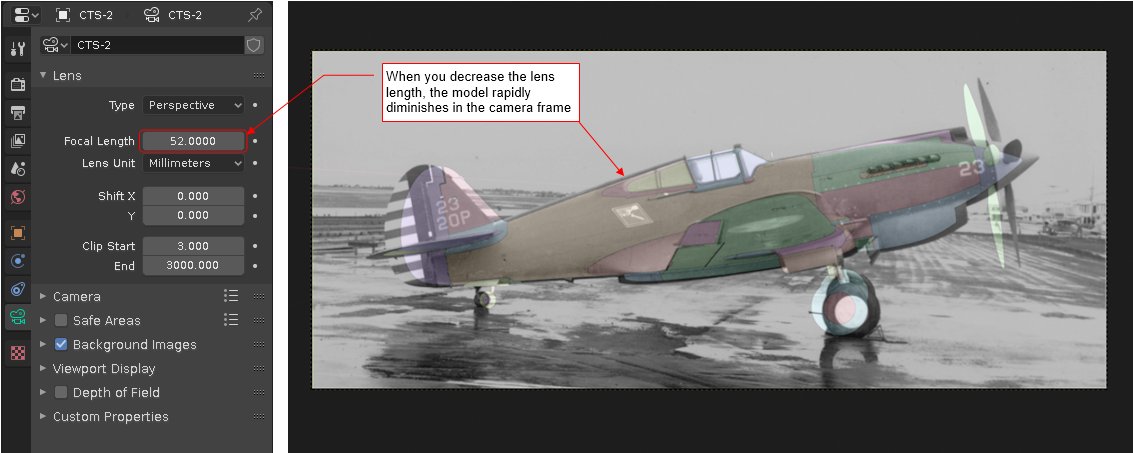
When you decrease the camera focal length, it decreases the relative size of the model in the camera frame (Fig. 11). When you increase focal length – the model “grows up” in the frame. Thus, in the standard Blender, after every change of the focal length you have to fit your model to the reference photo anew. Of course, the most obvious method is adjusting camera distance (along its local Z axis) from the model. You can ever calculate a movement that compensates changes in the focal length. Below you can see its idea:
|
| Fig. 12. Compensating with camera distance the changes in the lens length |
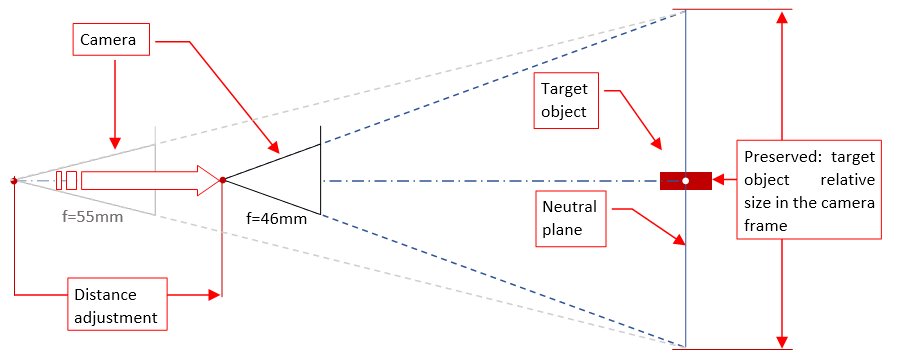
Anyway, still such a manual adjustment is quite cumbersome. That’s why I added to Reference Cameras plugin an automatic compensation of the lens length changes, which works as in Fig. 12. When you change the lens length of a reference camera, the add-on compensates this by changing the distance from the camera to its target. This movement is calculated in such a way that the relative size of the camera target in the camera frame remains constant. (This means, that this automatic compensation preserves relative size of any contour which lies on the plane which is perpendicular to the camera and passes through the origin of the camera target object. I am referring to this plane as “neutral plane”).
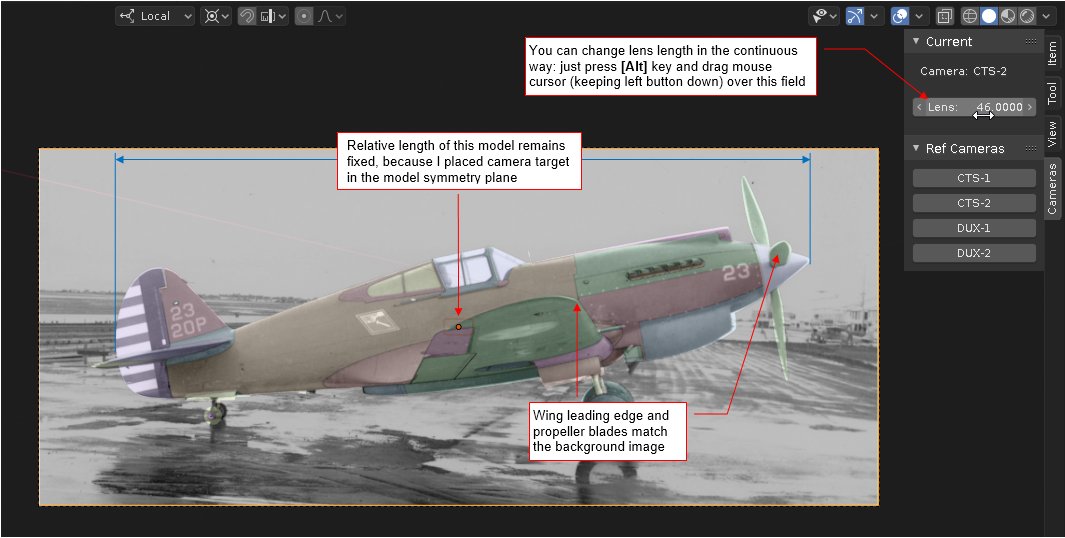
Thus, to easily adjust camera lens length without need for manual refitting the model for a projection which resembles a side view, place the camera target object in the aircraft symmetry plane. (In the case below I placed camera target inside the fuselage, in the cockpit):
|
| Fig. 13. An example of automatic lens length compensation |
Then when you start changing the camera lens length (for example, using the additional control exposed in the Cameras:Current panel, as in Fig. 13), you will see in its frame the changing proportions of the model (the shape of the wing trapezoid, direction of the propeller blade, etc.) Simultaneously, the model contour which lies on the aircraft symmetry plane remains fixed.
The best way to learn how the lens length affects your camera view is to change its value smoothly, using mouse. You can do it by dragging your mouse over the Current:Lens field, simultaneously keeping the [Alt] key down. (You can also use this trick in the Camera properties, Lens panel, altering the Focal Length field). If you want to increase precision of these changes – press also [Shift] key, while dragging your mouse.
Note: This automatic compensation occurs only for the lens length of the reference cameras, when the Reference Cameras add-on is activated;
Note: if you notice that the camera view “blinks” after every change of the camera focal length, open and then minimize the Blender Preferences window (Edit: Preferences). This simple step eliminates “blinking” of this view. (I cannot explain this effect, but at least in the current Blender version: 2.80, this add-on works smoothly when you have opened more than one Blender window.)