Many Blender Python scripts are prepared in a special way, which allows them to appear in
the Blender menus or panels. They are called add-ons. Usually such scripts are created for the wider audience of users.
Blender comes with a range of registered add-ons, ready to activate. You can still extend your personal subset of these tools by adding a new plugin.
It is very easy to incorporate them into your environment. Just:
- download a particular add-on from any Internet source. Usually, it is a single Python (*.py) file, sometimes packed (into *.zip file);
- unpack it, when the plugin is downloaded as a *.zip file;
- place the *.py file in the scripts\addons folder, located in the Blender configuration directory;
The Blender configuration directory is stored in the current user home directory. You can find it typing in the file explorer address bar:
%AppData%\Blender Foundation\Blender\2.8x
where "2.8x" means your Blender version.
For example, for Blender 2.80, installed in Windows 10, user named me, the folder where you should place the add-on file is:
C:\Users\me\AppData\Roaming\Blender Foundation\Blender\2.80\scripts\addons
Initially, the scripts\addons directory does not exist. You can create it there.
If you cannot find your user configuration directories, you still can do the same using Blender commands.
It may happen that in the future the structure of Blender folders will change.
Thus this is the safer way:
Open the Blender Preferences Window (Edit->Preferences…).
Select the Add-ons tab there (Fig. 1):
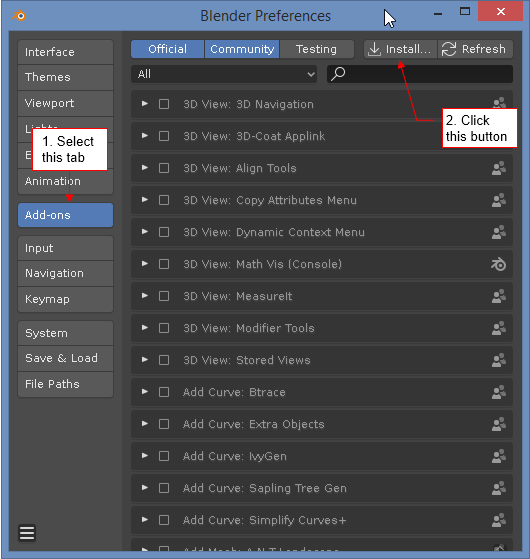
|
| Fig. 1. The list of currently registered add-ons. |
Click the Install… button, located on the “header”, at the bottom of the window.
It will open the file selection area (Fig 2):
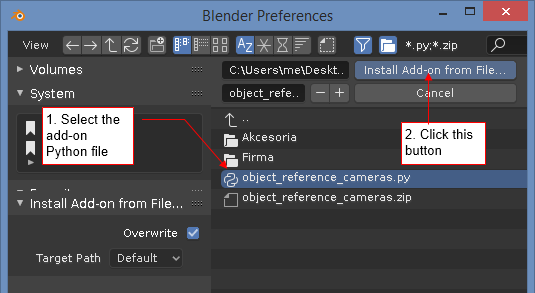
|
| Fig. 2. Selection of the add-on file. |
Select the *.py file of the add-on. (You can select only one file, here).
Then click the Install Add-on from File… button. It will bring you back to the Add-ons tab (Fig. 3)
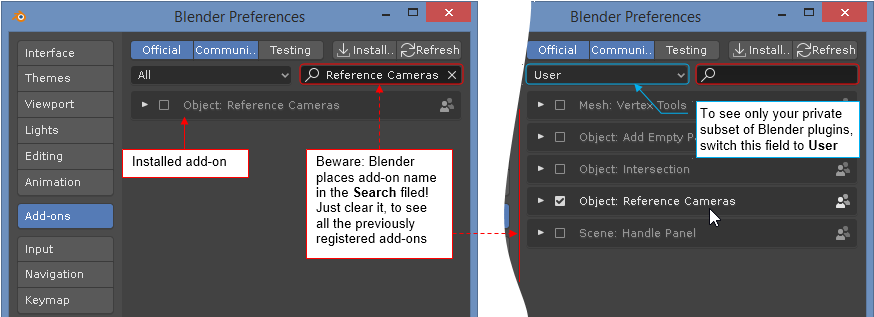
|
| Fig. 3. New add-on just after registration. |
Each Blender version creates its own user configuration subdirectory.
Just look at the Blender Foundation\Blender folder (Fig. 4):
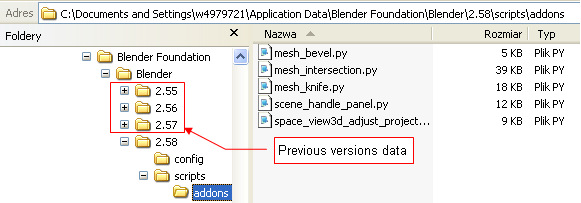
|
| Fig. 4. Exemplary content of user configuration folder. |
Fortunately, you do not have to copy the scripts\addons folder after every Blender upgrade.
On the first run of new Blender version, it displays an important button on its splash screen (Fig. 5):
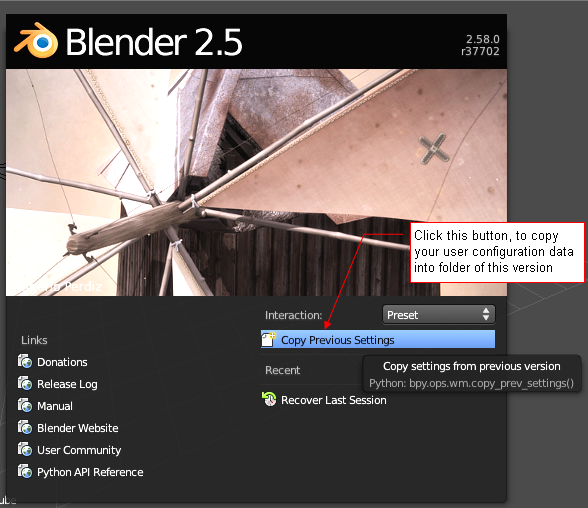
|
| Fig. 5. Splash screen on the first run of new Blender version. |
Use Copy Previous Settings command to preserve your settings (drawing defaults, add-ons)
from the previous Blender version. Blender displays it when it finds that the configuration directory for the current version
does not exists, yet.